Talk to Our Engineer, Get a Solution in 20 minutes
Our engineers are the expert in vacuum forming products, you can let them know any requirements and specific demands, then they work out the solution soonest and send back it for free.
Short answer: Yes — reliably, but only if you respect its personality. Acrylic (PMMA) rewards careful heating, controlled stretching, and post-process annealing with spectacular clarity and UV stability. Ignore those steps and it will repay you with crazing, tears, or parts that age badly.
Subtitle: this isn’t “just another plastic” Acrylic is the glass-look champion: crystal clear, glossy, and UV-hardy. That makes it the default for shop windows, museum displays, and light-guiding lenses. But unlike friendly thermoformers (PETG, thin ABS), acrylic behaves like a precision tool — a small mistake in temperature or clamping shows up as a ruined part. This article explains what to do, why it works, and how to set up quick experiments so your first run isn’t your last.
(Key point: the following technical ranges and procedures reflect manufacturer guidance and vacuum-forming handbooks — see linked references after each practical section).
For a broader overview of professional forming capabilities, see vacuum forming manufacturing.
Subtitle: brittle clarity vs. flexible process windows PMMA is an amorphous thermoplastic with excellent optical properties and good UV resistance. That clarity comes with tradeoffs: PMMA is relatively brittle and has a narrower useful forming window than more forgiving plastics. That’s why you’ll need more careful heat control, slower draws on deep features, and mandatory stress-relief afterward.
If you’re comparing materials, acrylic sits alongside other engineered plastics commonly used in vacuum forming materials.
Subtitle: the choice changes how the sheet behaves under heat
Real-world acrylic forming examples are covered in acrylic vacuum forming.
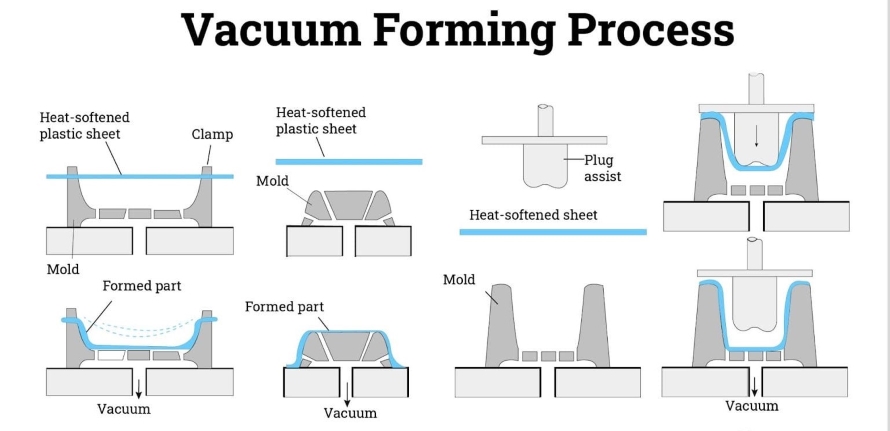
Subtitle: get even, predictable heat — everything else follows Typical forming bands reported by manufacturers and technical guides place acrylic forming between roughly 140–190 °C (≈285–375 °F) depending on thickness, grade, and equipment. PMMA shows a very useful visual indicator — it goes translucent/“clear” at the right forming zone — but don’t rely on sight alone: use pyrometers, thermocouples or calibrated IR. Uneven heating causes local overstretch, tearing, or crazing.
Heating control becomes even more critical in thick-gauge vacuum forming.
Subtitle: real changes that make a measurable difference
Advanced forming setups often combine vacuum and pressure through professional vacuum forming services.
Subtitle: design to avoid process pain, not to show off
Subtitle: don’t guess — diagnose and fix deliberately
Annealing relieves internal stress and is essential for PMMA especially if parts will be bonded, machined, solvent-welded or exposed to cleaning chemicals. Manufacturer guidance commonly recommends annealing around 80 °C (≈180 °F) with times based on thickness (for thin sheets at least ~2 hours; for thicker follow per-mm rules). A typical rule-of-thumb from fabrication manuals is ~1 hour per mm of thickness for heating to anneal (with minimum times for thin stock) and slow cooling — but check the sheet maker’s data sheet for exact schedules. Removing parts too early from the oven undoes the benefit.
Subtitle: a tested skeleton you can run tomorrow, then tailor
Important: This is a starting template. Tweak per sheet brand, machine, and mold. Always run coupons first.
Here is a clean, shop-ready “Quick Test Matrix” table you can drop directly into your blog or SOP.
It’s written from a real operator / process-engineer perspective, not generic textbook ranges.
Use these as starting targets, not absolutes. Always fine-tune per sheet brand, oven type, and mold depth.
| Acrylic Sheet Thickness | Target Sheet Surface Temp | Visual Readiness Cue (Very Important) | Typical Heating / Soak Time* | Plug Assist Recommendation | Forming Method | Annealing Starting Point |
|---|---|---|---|---|---|---|
| 1.5 mm (≈1/16″) | 140–155 °C | Sheet turns evenly glossy, no ripples, minimal sag | 30–90 seconds | Usually not required | Vacuum forming is sufficient | 80 °C × 2 hours |
| 3 mm (≈1/8″) | 145–165 °C | Uniform sag across frame, edges no longer “tight” | 1–3 minutes | Recommended for deeper pockets | Vacuum or pressure forming | 80 °C × 3 hours |
| 4.5–6 mm (≈3/16″–1/4″) | 150–170 °C | Slow, heavy sag; sheet feels rubbery, not floppy | 3–6 minutes | Strongly recommended | Pressure forming preferred | 80 °C × 4–6 hours |
| 8–10 mm (≈5/16″–3/8″) | 155–180 °C | Deep, controlled sag; no surface bubbles | 6–10+ minutes | Essential | Pressure forming + slow draw | 80 °C × 8–10 hours |
| >10 mm (thick optical parts) | 160–185 °C | Fully heat-soaked, core temperature stabilized | 10–15+ minutes | Mandatory | Pressure forming only | Follow manufacturer schedule (often 1 hr per mm) |
*Heating time assumes quartz or IR ovens. Convection ovens may require longer soak times.
Step 1 – Start cold and conservative
Begin at the lower end of the temperature range. Acrylic punishes overheating far more than underheating.
Step 2 – Watch the sheet, not just the thermometer
The most reliable signal is even sag + surface gloss.
If the center sags but edges stay stiff → heating is uneven.
Step 3 – Adjust one variable at a time
Change temperature OR soak time, never both at once.
Step 4 – Lock settings only after annealing success
A part that looks good but crazes after annealing means hidden stress — back off draw speed or add a plug assist.
| What You See | What It Means | Immediate Fix |
|---|---|---|
| White stress lines after forming | Sheet too cold or overstretched | Increase soak time or use plug assist |
| Tearing at corners | Localized thinning | Raise temp slightly + add plug assist |
| Surface haze or bubbles | Overheated acrylic | Reduce temp, shorten heating cycle |
| Part looks fine but crazes later | Residual stress | Improve annealing + gentler draw |
Most competitor blogs stop at “Acrylic forms at X degrees.”
This matrix connects temperature, thickness, behavior, tooling, and post-processing — which is how real vacuum forming actually works.
If you want, I can:
Just tell me what you want next.
Choose acrylic when clarity, gloss, and UV life are non-negotiable. If you need impact resistance, less finicky forming, or faster cycle times, evaluate polycarbonate (tough, broader forming window) or PETG (easier forming at slightly different temps). In many sign/display jobs acrylic wins on perceived value — but it costs more in technician time and scrap if your process control isn’t solid.
Common real-world failure: a shop heated 6 mm cast acrylic to “what looked warm enough” but never soaked the center; part tore at a thin web near a corner. The fix was twofold: increase the soak to bring core temp up, and add a light plug-assist to prebend material into the pocket so stretching wasn’t localized. Outcome: first-run success, optical finish preserved, zero crazing after a standard anneal. (This pattern — underheat + localized stretching — is one of the most repeatable causes of scrap in PMMA forming.)
Subtitle: the last-minute wartime checklist
Acrylic absolutely can be vacuum formed — and when you do it right the results are unmatched in clarity and finish. But PMMA is a precision material: it asks for careful heating, planned material flow (plug assists/pressure), and disciplined post-form annealing. If your project needs show-stopping optics and you’re willing to invest in process control, acrylic delivers. If you need speed, impact toughness, or a very wide forming window, consider PC or PETG instead.

TKP Plastic is China's leading provider of vacuum forming solutions. We are defined by our commitment to innovation, uncompromising quality, and total customer satisfaction. Our expertise enables us to deliver projects that excel in cost-effectiveness, intricate design, and sustainable manufacturing. Partner with TKP to bring your vision to life with precision and reliability.