Talk to Our Engineer, Get a Solution in 20 minutes
Our engineers are the expert in vacuum forming products, you can let them know any requirements and specific demands, then they work out the solution soonest and send back it for free.
A Warm, Practical Guide To Turning Flat Plastic Into Reliable Parts
Vacuum forming looks simple — heat a sheet, pull it over a mold — but the real skill is in the details. This guide explains what matters in practice (not just theory), why certain choices cost you time or money, and how to avoid the small mistakes that cause scrap, rework or late launches.
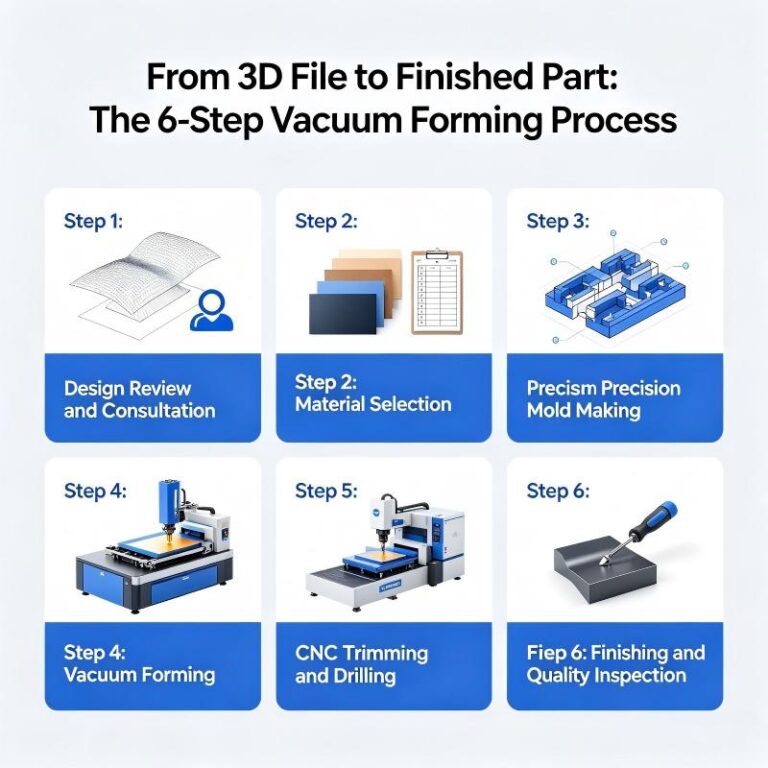
A Realistic Roadmap From Idea To Boxed Parts
Practical Design Choices That Determine Success Or Headaches
Design Is Where You Buy Insurance. Early choices — material, sheet thickness, male vs female mold, draft angles and where you place bosses — determine whether a part is cheap to make or a production nightmare. When in doubt, move critical features toward low-stretch areas or plan them as secondary assemblies. Call out intended finish, painting, mounting and service life in the first spec so material and tooling decisions don’t surprise you later.
How Heat Management Controls Detail, Strength And Consistency
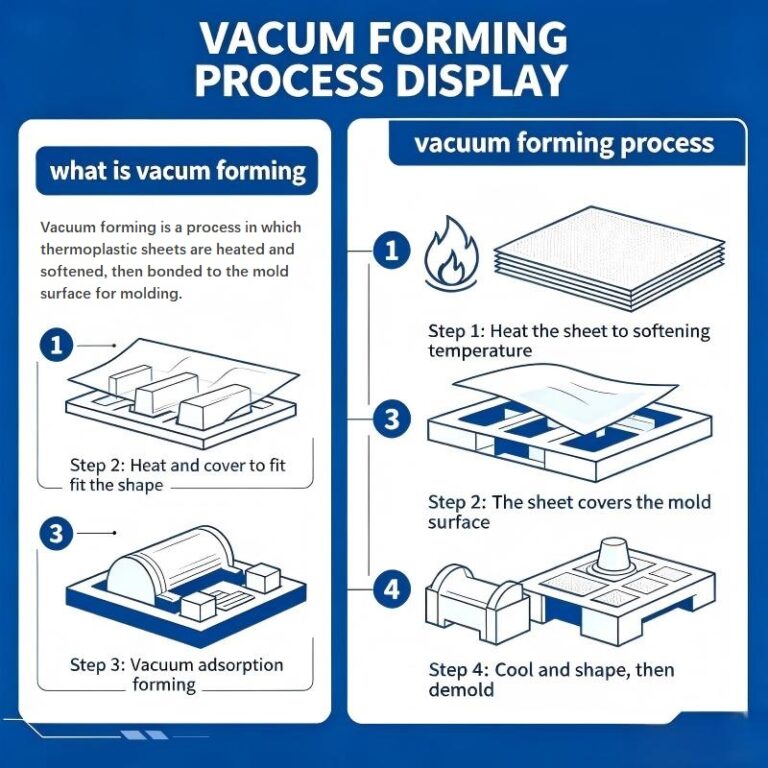
Heat Is The Process Governor. The goal is uniform temperature through the sheet’s thickness in the forming window for that polymer. Uneven heating causes localized thinning, bubbles, or tears. Infrared panels are fast; convection ovens are gentler. For deep-draw parts, shops often use staged heating and timed indexing rather than “heat until it looks right.”
The Transformative Moment And How To Control Material Flow
Forming Is Not Just Pulling A Sheet Down. Use Plug Assists To Redistribute Material Into Deep Areas. Consider Pressure Forming For Fine Details — adding positive air pressure opposite the vacuum improves surface reproduction and reduces the amount the material must stretch. Think of the sheet as a finite pool of material — where it flows matters.
How Cooling Strategy Affects Warpage And Cycle Time
Cooling Locks In Geometry — But Too Fast Or Too Slow Causes Problems. Chilled molds speed cycles and reduce residual stress, while passive cooling may be OK for small runs. Demold Timing Is A Practical Art: demold too soon and the part distorts; wait too long and the part sticks or damages the mold.
Turning A Blank Into A Functional, Attractive Component
Trim Method Follows Volume And Tolerance. Low Volume = Hand/Router Trimming. Medium Volume = Die Cutting Or CNC Routing. High Volume = Dedicated Trim Dies Or Automatic Routers. Plan fastening, sealing, and decoration up front to decide whether you need thermal welding, solvent bonding, insert molding, or post-machined bosses.
Checks That Keep Parts Fit-For-Purpose And Reproducible
QC Is More Than A Final Check. Add Go/No-Go Checks For Critical Features, Periodic Wall-Thickness Mapping During Start-Up, And Batch Records For Traceability If The Product Has Safety Or Regulatory Requirements. Optical Scanning Helps Validate Complex Geometry Quickly.
Concrete Design Moves That Reduce Cost And Scrap
Why Temperature Strategy Is The Single Biggest Determinant Of Yield
Think In Terms Of Process Windows, Not Single Numbers. For any polymer you pick, define an oven profile: heater power, dwell time, and indexing schedule. For repeatable runs, log oven zones and forming times and treat them like process parameters — small changes in heat rhythm change where material thins and whether a part will split.
Fast, Practical Fixes For The Problems You’ll See On The Shop Floor
A One-Page List Designers Can Use Before They Send Drawings To Tooling
A Short Walkthrough Of Tradeoffs And Why They Matter
Project Brief: A Shallow Medical Tray, 300 × 200 mm, 30 mm Deep, Must Be Clear, Sterilizable, With Two Bosses For Clips.
Key Decisions: Choose A Clear, Sterilizable Polymer (Consider PETG For Clarity; Verify Autoclave Compatibility). Use A Female Aluminum Mold For Surface Quality And Cooling. Target 1.5 mm Sheet To Achieve Stiffness; Add Plug Assist To Preserve 1.2 mm Wall Thickness In Corners. Trim With CNC For Accurate Bosses; Add Ultrasonic Welding Pads For Assembly.
Why This Works: The female mold and plug assist control material distribution, aluminum tooling speeds cooling and minimizes cycle variation, and CNC trimming ensures boss location for clip fit. The upfront choices reduce scrap and save time during validation.
Practical Ways To Cut Waste And Energy Without Compromising Quality
Where Vacuum Forming Shines And When To Consider Alternatives
Vacuum Forming Is Excellent For Large Parts, Low-To-Medium Volumes, And Fast Tooling Turnarounds. If You Need Tiny, Feature-Dense Parts At Very High Quantities Or Super-Tight Dimensional Control, Injection Molding Is Usually Cheaper Per Part — But Costs More In Tooling And Time. Think Of Vacuum Forming As “Big, Fast, And Cost-Effective” Within Its Strengths.
No-Nonsense Advice To Get Parts Right The First Time
Good vacuum forming is mostly about smart choices before the oven: place strength where it’s needed, control your heat profile, and treat plug assists as a first-line design tool for difficult shapes. If you want, paste a drawing now — I’ll give a short manufacturability review (what to change, likely failure modes, and a recommended material/tooling approach).
Q: What’s the difference between vacuum forming and pressure forming?
A: Vacuum forming uses negative pressure to pull the sheet onto the mold. Pressure forming adds positive air pressure on the non-mold side to improve detail and surface finish.
Q: Can vacuum forming achieve tight tolerances?
A: It can hit reasonable tolerances for many applications, but not as tightly as injection molding. Use precise aluminum molds, controlled heating and post-trimming to improve repeatability.
Q: Which plastics are best for vacuum forming?
A: Thermoformable polymers like HIPS, ABS, PETG, and polycarbonate are common. Choice depends on mechanical needs, aesthetic finish and post-processing.
Q: Is vacuum forming environmentally friendly?
A: It can be — when using recyclable materials, minimizing scrap via nesting, and employing energy-efficient equipment. Regrind and closed-loop recycling help.
Q: How many parts can I make before tooling needs replacing?
A: Tool life depends on material, mold material and part complexity. Aluminum molds can last many thousands to millions of cycles; softer molds will wear faster.

TKP Plastic is China's leading provider of vacuum forming solutions. We are defined by our commitment to innovation, uncompromising quality, and total customer satisfaction. Our expertise enables us to deliver projects that excel in cost-effectiveness, intricate design, and sustainable manufacturing. Partner with TKP to bring your vision to life with precision and reliability.